
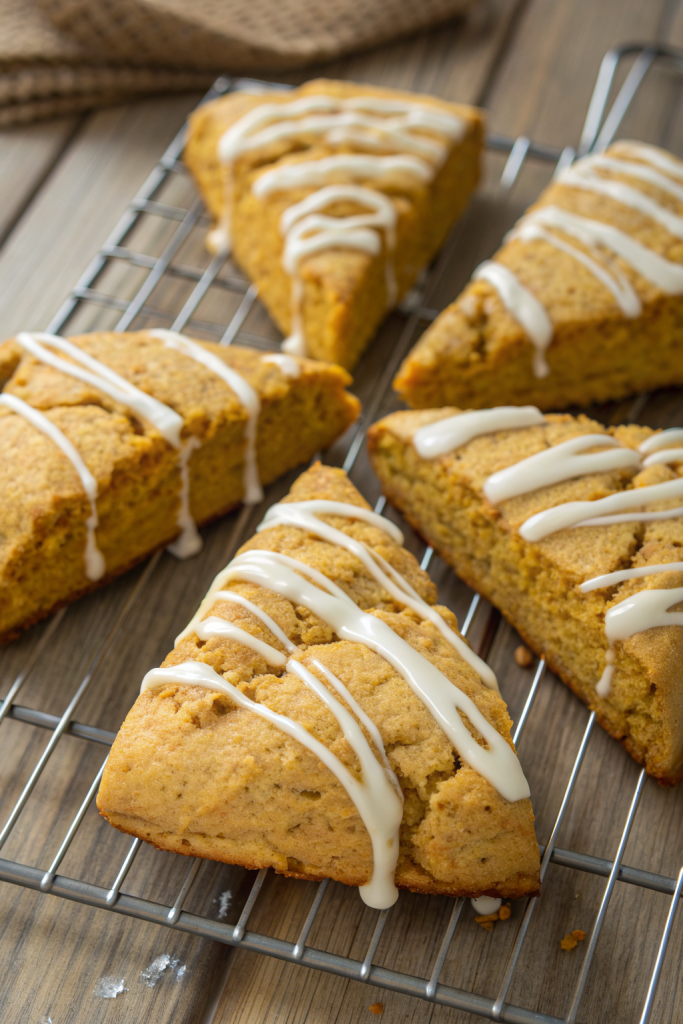
Flaky Pumpkin Scones with Vanilla Icing taste like a cozy October morning baked into a tender, buttery triangle with warm spices and a sweet, creamy drizzle. They suit fall brunch lovers, pumpkin spice fans, and anyone who wants a bakery-style treat at home in about 45 minutes. I tested these while my dog judged me from the couch, and I still ate two in one sitting with zero regrets.
Why Flaky Pumpkin Scones with Vanilla Icing Is Worth It
These pumpkin scones bake up tall, crisp on the edges, and tender in the center, with real pumpkin and cinnamon-forward spice in every bite. The vanilla icing adds a creamy, sweet finish that balances the earthy pumpkin and makes them taste like something from a fancy coffee shop bakery case.
You mix the dough in one bowl, pat it into a circle, and cut it into wedges, so the method stays simple enough for a weekend morning. The recipe uses pantry staples, canned pumpkin, and one baking sheet, which keeps cleanup easy and stress low.
“These Flaky Pumpkin Scones with Vanilla Icing taste like a coffee shop treat but bake up at home in under an hour, and they disappear instantly. ★★★★★”
Ingredients You Need
Dry ingredients
- All-purpose flour – standard unbleached flour works great; use a kitchen scale if you have one for best texture.
- Granulated sugar – just enough to sweeten the dough without turning it into cake.
- Brown sugar – adds moisture and a light molasses note that pairs nicely with pumpkin.
- Baking powder – gives lift and height; use a fresh can for the best rise.
- Fine sea salt – sharpens the flavors and keeps the sweetness in check.
- Ground cinnamon – the main spice note; use a fresh, fragrant brand.
- Ground nutmeg – adds warmth; grate fresh if you feel fancy.
- Ground ginger – gives a gentle kick that brightens the pumpkin.
- Ground cloves – a tiny amount goes a long way, so measure lightly.
Cold ingredients
- Unsalted butter, very cold – cut into small cubes; I like to chill the cubes in the freezer for 10 minutes before mixing to keep the dough extra flaky.
- Heavy cream – keeps the crumb tender and rich; you can use half-and-half in a pinch, though the texture turns slightly less rich.
- Canned pumpkin puree – use 100% pumpkin, not pumpkin pie filling; Libby’s or store brand both work.
- Large egg – binds the dough and adds structure.
- Vanilla extract – choose pure vanilla for the best flavor, since it also goes in the icing.
Vanilla icing ingredients
- Powdered sugar – sift it if it looks clumpy, so the icing stays smooth.
- Milk or heavy cream – milk gives a thinner drizzle, cream gives a richer, slightly thicker icing.
- Vanilla extract – rounds out the sweetness and ties the icing to the scone flavor.
- Pinch of salt – keeps the icing from tasting flat or overly sugary.
Optional add-ins and toppings
- Mini chocolate chips – fold into the dough for a pumpkin-chocolate combo.
- Chopped toasted pecans or walnuts – add crunch and a nutty flavor.
- Extra cinnamon or pumpkin spice – sprinkle on top of the wet icing.
Equipment list
- Mixing bowls – one large, one medium.
- Whisk and rubber spatula.
- Pastry cutter, fork, or clean fingertips to work in the butter.
- Bench scraper or sharp knife to cut the scones.
- Baking sheet lined with parchment paper or a silicone baking mat.
- Pastry brush for brushing cream on top.
- Cooling rack.
Quick Tips & substitutions
- Keep the butter and cream very cold so the scones bake up tall and flaky.
- Use canned pumpkin puree, not pumpkin pie filling, since pie filling already includes sugar and spices.
- Blot the pumpkin with a paper towel if it looks watery; this keeps the dough from turning sticky.
- Handle the dough gently and as little as possible to avoid tough scones.
- If the dough feels too sticky, sprinkle in 1–2 extra tablespoons of flour while you gently bring it together.
- If the dough feels too dry or crumbly, add 1–2 teaspoons of cream until it holds when you press it.
- Chill the cut scones in the fridge or freezer for 15–20 minutes before baking to help them keep their shape.
- Swap heavy cream with full-fat canned coconut milk for a dairy-light version, and use vegan butter for a dairy-free twist.
- Use gluten-free 1:1 baking flour if you avoid gluten; choose a blend that includes xanthan gum.
- Stir the icing until smooth and thick but pourable; add milk by the teaspoon so it does not thin too much.
How to Make Flaky Pumpkin Scones with Vanilla Icing
Step 1: Mix the dry ingredients
Add flour, granulated sugar, brown sugar, baking powder, salt, cinnamon, nutmeg, ginger, and cloves to a large mixing bowl. Whisk until everything looks evenly combined and no streaks of spice remain. This step spreads the leavening and spices evenly, which gives consistent flavor and rise.
Step 2: Cut in the cold butter
Add the cold butter cubes to the dry ingredients. Use a pastry cutter, fork, or your fingertips to work the butter into the flour until you see pea-sized bits with some slightly larger flakes. Those visible butter pieces create steam in the oven and give the scones their flaky layers.
Step 3: Whisk the wet ingredients
In a separate medium bowl, whisk together the pumpkin puree, heavy cream, egg, and vanilla extract. Mix until the mixture looks smooth and uniform. This step helps the pumpkin and egg distribute evenly through the dough.
Step 4: Bring the dough together
Pour the pumpkin mixture into the flour-butter mixture. Use a rubber spatula to fold the wet and dry ingredients together until a shaggy dough forms and no big pockets of dry flour remain. The dough should look slightly sticky but still hold together when you press it.
If you want add-ins like chocolate chips or nuts, sprinkle them over the dough and gently fold them in now. Avoid overmixing, since that can toughen the scones. Aim for just-combined with some roughness still visible.
Step 5: Shape and cut the scones
Lightly flour your work surface and turn the dough out onto it. Gently pat the dough into a circle about 1-inch thick, using your hands to nudge the edges into a neat round. Use a bench scraper or sharp knife to cut the circle into 8 equal wedges, like a pizza.
Transfer the wedges to a parchment-lined baking sheet, leaving space between each one. If the dough feels soft or warm, slide the baking sheet into the fridge or freezer for 15–20 minutes. This quick chill helps the butter firm up again and gives better lift in the oven.
Step 6: Brush and bake
Preheat your oven to 400°F (200°C) while the scones chill. Brush the tops of the scones lightly with a bit of heavy cream, which helps them brown nicely. If you like a bit of crunch, sprinkle a little coarse sugar on top.
Bake the scones for 18–22 minutes, until the tops look golden and the edges feel set. A toothpick inserted into the center should come out mostly clean, with just a few moist crumbs. Slide the baking sheet onto a cooling rack and let the scones cool at least 15 minutes before icing.
Step 7: Mix the vanilla icing
In a medium bowl, whisk powdered sugar, vanilla extract, a pinch of salt, and 1–2 tablespoons of milk or cream. Add the liquid slowly and whisk until the icing looks smooth and thick but still flows in a ribbon from the whisk. If it looks too thick, add more milk a teaspoon at a time; if it looks too thin, whisk in a bit more powdered sugar.
Step 8: Drizzle and set
Once the scones feel warm but not hot, drizzle the vanilla icing over the tops in zigzags or spoon it on in thicker lines. If you want extra flair, sprinkle a tiny pinch of cinnamon or chopped nuts over the wet icing. Let the icing set for about 10–15 minutes, then serve.
Recipe Variations
- Gluten-free: Use a 1:1 gluten-free baking flour blend and chill the dough well before baking to help it hold shape.
- Dairy-free: Use vegan butter sticks and full-fat canned coconut milk instead of cream, and mix the icing with a dairy-free milk.
- Egg-free: Swap the egg with 3 tablespoons of pumpkin puree plus 1 teaspoon of oil; the texture turns slightly denser but still tender.
- Low sugar: Cut the sugar in the dough by one-third and drizzle a thinner layer of icing or skip the icing and brush with cream only.
- Extra spice: Add a pinch more cinnamon and ginger if you like a stronger pumpkin spice flavor.
- Chocolate chip: Fold in ½–¾ cup mini chocolate chips for a pumpkin mocha coffee shop vibe.
- Nutty crunch: Stir in ½ cup chopped toasted pecans or walnuts and sprinkle a few on top of the icing.
Ways to Serve Flaky Pumpkin Scones with Vanilla Icing
- Serve warm with a mug of hot coffee, chai, or cocoa for a cozy breakfast.
- Plate them with scrambled eggs and fruit for a balanced weekend brunch.
- Pack one in a lunchbox as a sweet afternoon treat.
- Slice a cooled scone in half and warm it briefly in a toaster oven, then enjoy with a small pat of butter.
- Offer them on a fall dessert board with apple slices, grapes, and a bowl of yogurt for dipping.
Storage Success
Store cooled Flaky Pumpkin Scones with Vanilla Icing in an airtight container at room temperature for up to 2 days. If you want them to last longer, keep them in the fridge for up to 4–5 days and warm them briefly in a low oven to refresh the texture. You can also freeze un-iced scones for up to 2 months, then thaw at room temperature and warm them before adding fresh vanilla icing. Keep a small piece of parchment between stacked scones so they do not stick together.
Flaky Pumpkin Scones with Vanilla Icing
Ingredients
Instructions
- In a large mixing bowl, whisk together the flour, granulated sugar, brown sugar, baking powder, salt, cinnamon, nutmeg, ginger, and cloves until evenly combined and no streaks of spice remain.
- Add the very cold butter cubes to the dry ingredients. Use a pastry cutter, fork, or your fingertips to work the butter into the flour until you see pea-sized bits with some slightly larger flakes throughout.
- In a separate medium bowl, whisk the pumpkin puree, heavy cream, egg, and vanilla extract until the mixture looks smooth and uniform.
- Pour the pumpkin mixture into the flour-butter mixture. Use a rubber spatula to fold everything together until a shaggy dough forms and no big pockets of dry flour remain. The dough should look slightly sticky but hold together when pressed.
- If using chocolate chips or nuts, sprinkle them over the dough and gently fold just until they are distributed, avoiding overmixing.
- Lightly flour your work surface and turn the dough out onto it. Gently pat the dough into a circle about 1 inch thick, nudging the edges into a neat round.
- Use a bench scraper or sharp knife to cut the circle into 8 equal wedges, like a pizza. Transfer the wedges to a parchment-lined baking sheet, leaving space between each one.
- If the dough feels soft or warm, chill the baking sheet with the cut scones in the fridge or freezer for 15–20 minutes to help them keep their shape and bake up flaky.
- While the scones chill, preheat the oven to 400°F (200°C). Just before baking, brush the tops lightly with heavy cream and, if desired, sprinkle with coarse sugar for crunch.
- Bake for 18–22 minutes, until the tops are golden and the edges feel set. A toothpick inserted into the center should come out mostly clean with a few moist crumbs. Transfer the baking sheet to a cooling rack and let the scones cool for at least 15 minutes before icing.
- In a medium bowl, whisk together the powdered sugar, vanilla extract, pinch of salt, and 2 tablespoons of milk or cream until smooth and thick but pourable. Add more milk a teaspoon at a time if needed, or more powdered sugar if it becomes too thin.
- When the scones are warm but not hot, drizzle the vanilla icing over the tops in zigzags or spoon it on in thicker lines. If desired, sprinkle a tiny pinch of cinnamon, pumpkin spice, or chopped nuts over the wet icing.
- Let the icing set for 10–15 minutes, then serve the scones slightly warm or at room temperature.
Notes
Approximate per 1 scone with icing (8 scones total): 320 calories; fat 16 g; saturated fat 10 g; carbohydrates 40 g; fiber 2 g; sugars 18 g; protein 5 g; sodium 260 mg. Values are estimates and will vary based on exact ingredients, add-ins, and portion size. Storage: Store cooled scones in an airtight container at room temperature for up to 2 days or in the refrigerator for 4–5 days. Rewarm briefly in a low oven to refresh. For longer storage, freeze un-iced scones for up to 2 months, then thaw, warm, and add fresh icing before serving.