
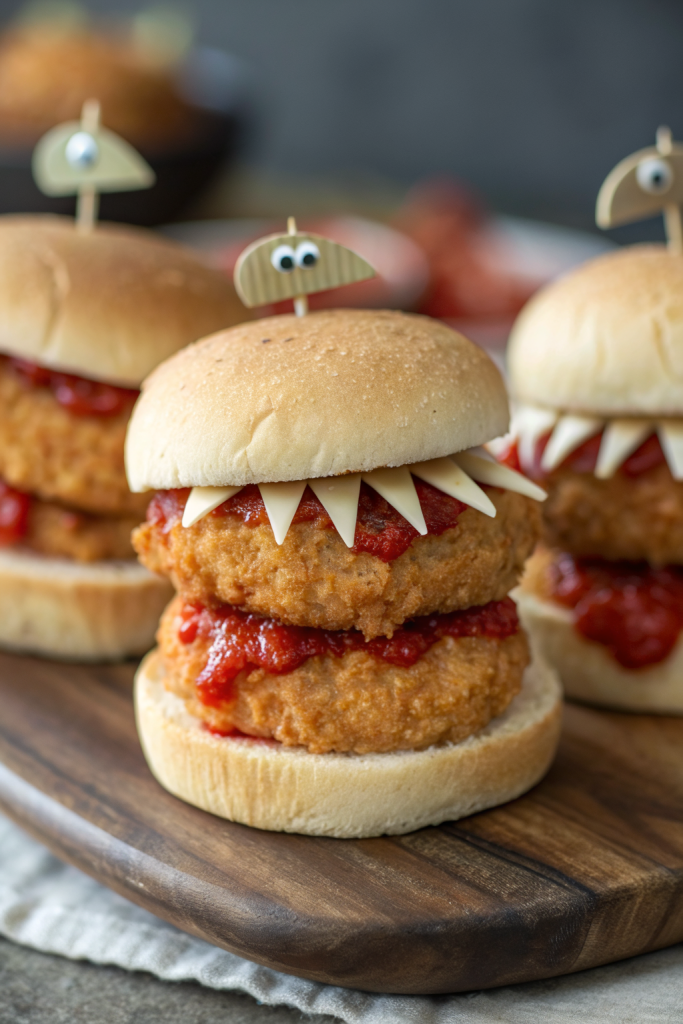
Halloween Chicken Parm Sliders Recipe tastes like cheesy, saucy chicken parmesan tucked into buttery garlic rolls with a fun spooky twist. It works perfectly for busy families or Halloween parties because you pull it together in about 45 minutes, start to finish. I tested these on my own neighbors during trick-or-treat night, and not a single slider survived.
Why Make This Halloween Chicken Parm Sliders Recipe at Home
You control the quality of the chicken, the amount of cheese, and the level of spooky decorations on top. Kids get a fun, not-too-scary dinner, and adults get something more exciting than another bowl of candy.
You also prep everything on one sheet pan, so cleanup stays easy even when your kitchen looks like a costume tornado hit it. Leftovers reheat well, so you feed hungry goblins before or after trick-or-treating.
“These Halloween Chicken Parm Sliders disappeared faster than the candy bowl and tasted ten times better. ★★★★★”
Ingredients You Need
Slider basics
- 1 package (12-count) soft slider rolls or Hawaiian rolls
- 2 cups cooked breaded chicken cutlets, chopped or sliced
- Shortcut: use frozen breaded chicken tenders or patties and bake them first.
- 1.5 cups marinara sauce
- Use your favorite jarred brand or homemade; choose a thicker sauce so the sliders do not turn soggy.
- 2 cups shredded mozzarella cheese
- 1/2 cup grated Parmesan cheese
- 2 tablespoons butter, melted
- 1 teaspoon garlic powder
- 1 teaspoon Italian seasoning
- Salt and black pepper to taste
Halloween decorations
Pick a few of these to give the sliders a spooky vibe:
- 6 slices mozzarella or provolone cheese, cut into circles or squares
- 12 sliced black olives, cut into rings for “eyeballs”
- 1 small red bell pepper, cut into thin strips for “scars” or “mouths”
- 1 small green bell pepper, cut into thin strips for “monster hair”
- Ketchup or extra marinara in a squeeze bottle to drizzle as “blood”
- Small basil leaves to look like tiny monster tongues or leaves on “pumpkin” faces
Optional flavor boosters
- 1/4 teaspoon red pepper flakes for a little heat
- 1 tablespoon pesto stirred into the marinara for extra herby flavor
- Extra garlic powder if your crowd loves garlic as much as mine does
Equipment list
- Large baking sheet or 9×13 baking dish
- Parchment paper or foil for easier cleanup
- Small saucepan or microwave-safe bowl for melting butter
- Sharp knife or bread knife
- Cutting board
- Small cookie cutters or a paring knife for cutting cheese shapes
- Silicone brush or pastry brush
Tips & Mistakes
- Slice the whole sheet of rolls horizontally in one piece so the sliders stay together and build easily.
- Toast the bottom half of the rolls for a few minutes before adding sauce so they stay sturdy and not soggy.
- Dry the cooked chicken with paper towels if it looks greasy so the filling stays crisp.
- Warm the marinara slightly before assembly so the sliders heat evenly and faster.
- Keep the sauce layer light on the bottom and heavier on top of the chicken to avoid soggy bread.
- Use freshly shredded mozzarella so it melts smoother than pre-shredded bagged cheese.
- Add Halloween decorations after the cheese melts so the faces stay clear and do not slide off.
- Cut the sliders with a sharp serrated knife and gentle sawing motions so the fillings stay inside.
- Let the sliders rest 5 minutes before cutting so the cheese sets a bit and does not run everywhere.
- Keep kids away from the hot pan while they decorate; move the pan to a trivet or cutting board first.
How to Make Halloween Chicken Parm Sliders Recipe
Step 1: Prep the chicken and rolls
Preheat your oven to 350°F and line a baking sheet or baking dish with parchment or foil. Cook your breaded chicken according to package directions or use leftover cutlets, then chop or slice them into bite-size pieces. Slice the entire sheet of slider rolls in half horizontally so you have a big top and bottom piece.
Place the bottom half of the rolls on the prepared baking sheet. Brush lightly with a bit of melted butter and toast in the oven for 3 to 5 minutes until they feel slightly firm. This step keeps the sliders sturdy once you add sauce.
Step 2: Build the saucy chicken layer
Spread a thin layer of marinara over the toasted bottom buns. Aim for just enough to cover, not enough to pool. Season with a pinch of salt, black pepper, and red pepper flakes if you like heat.
Arrange the chopped chicken in an even layer over the sauced buns. Spoon more marinara over the chicken, using the rest of the sauce. Keep the edges a little cleaner so sauce does not spill out too much while baking.
Step 3: Add the cheesy goodness
Sprinkle the shredded mozzarella evenly over the chicken and sauce. Follow with the grated Parmesan, focusing a bit extra along the edges where cheese likes to crisp. If you enjoy extra cheese pulls, add a handful more mozzarella in the center.
Place the top half of the rolls over the cheese layer. Press down gently so everything settles together but do not smash them flat. You want a snug, stacked slider, not a pancake.
Step 4: Garlic butter topping
Stir the melted butter with garlic powder, Italian seasoning, and a pinch of salt. Brush this mixture generously over the tops of the rolls, making sure you reach all the corners. The rolls should look glossy and well coated.
If you like a little crunch, sprinkle a tiny bit of extra Parmesan on top. That topping bakes into a golden, cheesy crust. It also makes your kitchen smell like an Italian Halloween party.
Step 5: Bake until melty
Slide the pan into the oven and bake for 15 to 18 minutes. The cheese should melt completely and the tops should turn golden brown. If the tops brown too quickly, tent the pan loosely with foil.
Check the center to make sure the cheese melted and the chicken feels hot. Pull the pan out and let the sliders rest 5 minutes. This short rest keeps the fillings from sliding right out when you cut them.
Step 6: Add Halloween faces and decorations
Cut slices of mozzarella or provolone into circles, squares, or jagged shapes. Lay them on top of individual slider tops to form ghost faces, mummy wraps, or monster heads. Use olive slices as eyes, bell pepper strips as mouths or stitches, and basil leaves as tongues or leaves.
Drizzle a little ketchup or extra marinara in thin lines to look like spooky “blood.” Keep the decorations simple so you still pick up the sliders easily. Kids love to help with this part, so hand them a small bowl of toppings and let them design a few monsters.
Step 7: Slice and serve
Use a sharp serrated knife to cut along the lines between rolls. Saw gently instead of pressing straight down so the fillings stay put. Transfer each Halloween Chicken Parm Slider to a platter or board.
Serve them warm while the cheese still stretches. Keep extra marinara on the side for dipping. Watch them vanish faster than your favorite fun-size candy.
Variations I've Tried
-
Spicy “vampire” sliders: Add sliced pickled jalapeños over the chicken and stir red pepper flakes into the marinara. Use extra “blood” sauce on top for drama. This version suits older kids and spice fans.
-
Mummy sliders: Skip shredded cheese on top and use thin strips of sliced mozzarella laid across each roll like mummy bandages. Add olive slice eyes peeking through. Kids go wild for these.
-
Pumpkin face sliders: Use orange cheddar slices cut into pumpkin shapes and add bell pepper or olive pieces as eyes and mouths. Brush the tops lightly with extra butter so the cheddar melts just around the edges. These look great on a Halloween buffet.
-
Chicken parm “pizza” sliders: Add a thin layer of pepperoni on top of the chicken before the cheese. Sprinkle a pinch of oregano and extra Parmesan. You get a fun mashup of chicken parm and pizza in one bite.
How to Serve Halloween Chicken Parm Sliders Recipe
Serve these Halloween Chicken Parm Sliders hot on a big platter with extra marinara in a bowl for dipping. Pair them with a simple green salad, carrot sticks, or celery sticks so you sneak in some veggies between candy runs. Add a side of baked fries or sweet potato wedges for a more filling dinner. Offer apple slices, grapes, or clementines on the table to balance the cheesy goodness.
How to store
- Fridge: Cool sliders completely, then place them in an airtight container or wrap tightly; store in the refrigerator for up to 3 days.
- Freezer: Wrap individual sliders in foil, then place them in a freezer bag; freeze for up to 2 months.
- Reheat in oven: Reheat in a 350°F oven, covered with foil, for 10 to 15 minutes from the fridge or 20 to 25 minutes from frozen, until hot and the cheese melts again.
- Reheat in microwave: Heat one slider at a time on a microwave-safe plate in 20 to 30 second bursts until warm, then crisp the top in a toaster oven if you want more texture.