
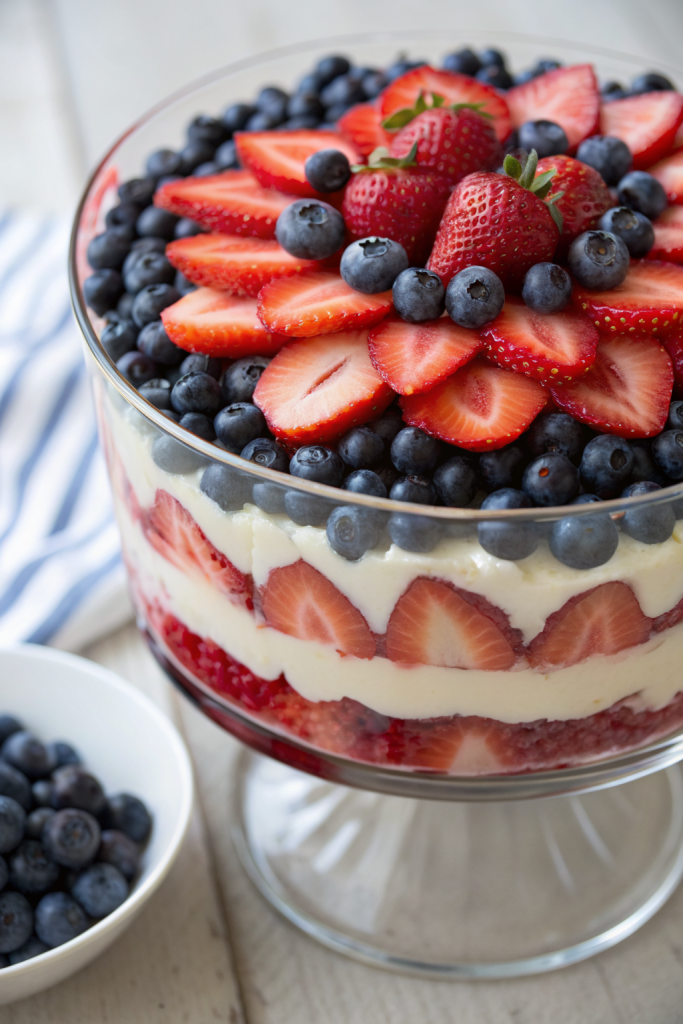
How to Make No-Bake Red White Blue Trifle tastes like a creamy, fruity, Fourth-of-July party in a bowl, with layers of soft cake, juicy berries, and fluffy vanilla cream. It works perfectly for busy hosts who want a patriotic dessert on the table in under 30 minutes of hands-on time. I first made this for a last-minute backyard cookout, and my neighbors still ask me to “bring the flag bowl” every summer.
Why Make This How to Make No-Bake Red White Blue Trifle at Home
You skip the oven, keep your kitchen cool, and still serve a dessert that looks like you spent all day on it. The layers of cake, berries, and cream taste rich but still feel light enough after burgers, hot dogs, and all the sides.
You also control the sweetness and ingredients, which helps if you cook for kids, picky eaters, or anyone with food sensitivities. You can use store-bought shortcuts or go fully from-scratch, and both versions still impress.
My family scraped the trifle bowl clean and asked if I could double it next time, so I knew this recipe earned a permanent spot on our summer menu. ★★★★★
Ingredients You Need
Base layer options
You can use any soft, neutral cake that you can cube easily. Use about 10 to 12 cups of 1-inch cubes total.
- Store-bought pound cake
- Great shortcut and holds its shape well.
- Sara Lee or similar brands work nicely.
- Store-bought angel food cake
- Lighter texture, slightly less rich but very fluffy.
- Homemade vanilla cake or sponge
- Use if you already baked one or have leftover cake.
- Store-bought plain sponge cake or loaf cake
- Check the bakery section for “vanilla loaf” or “sponge loaf.”
Cream layer
This layer gives that classic trifle texture: fluffy, creamy, and just sweet enough.
- 8 oz cream cheese, softened
- Use full-fat for best texture; low-fat turns runny.
- 1/3 to 1/2 cup powdered sugar
- Adjust to taste; start low if your cake tastes very sweet.
- 1 teaspoon vanilla extract
- Pure vanilla tastes best, but imitation works in a pinch.
- 1/4 teaspoon almond extract (optional)
- Adds a bakery-style flavor; skip if you dislike almond.
- 2 cups cold heavy whipping cream
- Use very cold cream so it whips quickly and holds peaks.
Shortcut option:
- 2 tubs (8 oz each) frozen whipped topping, thawed
- Fold 1 tub into the sweetened cream cheese and use the second tub as the top layer.
- This option saves time and still tastes great.
Fruit layer
You want bright, fresh flavors and strong red and blue colors.
- 3 cups fresh strawberries, hulled and sliced
- Choose ripe but firm berries so they hold their shape.
- 2 cups fresh raspberries
- Handle gently; they crush easily.
- 2.5 to 3 cups fresh blueberries
- Rinse and dry well so they do not water down the cream.
Optional fruit swap ideas:
- Use cherries instead of raspberries if you prefer.
- Use blackberries along with blueberries for extra texture.
- Use frozen berries only if you thaw and pat them very dry first.
Simple fruit soak (optional but tasty)
This step adds flavor and keeps the fruit juicy without turning it soggy.
- 2 tablespoons lemon juice
- 2 tablespoons honey or maple syrup
- 1 teaspoon vanilla extract
Whisk these together and toss gently with the berries right before layering.
Simple syrup for cake (optional)
This helps dry cake taste moist and flavorful.
- 1/4 cup water
- 1/4 cup sugar
- 1 teaspoon vanilla extract or almond extract
Heat water and sugar in a small pot until the sugar dissolves, then cool and stir in the extract.
Garnish
- Extra whole strawberries and blueberries
- Fresh mint leaves
- Patriotic sprinkles or star-shaped sprinkles
Equipment list
- Large glass trifle bowl or clear glass bowl
- Hand mixer or stand mixer with whisk attachment
- Large mixing bowl
- Small bowl for fruit soak
- Cutting board and sharp knife
- Rubber spatula
- Measuring cups and spoons
Tips & Mistakes
- Cut the cake into even 1-inch cubes so it stacks neatly and soaks the cream without turning mushy.
- Dry the berries thoroughly after rinsing so they do not water down the cream layers.
- Taste the cream mixture before you fold in the whipped cream and adjust the sweetness then.
- Whip the cream until it forms medium to stiff peaks so the trifle holds its layers and does not slump.
- Let the cream cheese soften fully so it blends smooth and does not leave tiny lumps.
- Use a clear glass bowl so everyone can see the red, white, and blue layers.
- Avoid over-soaking the cake with syrup; lightly brush or drizzle instead of pouring.
- Chill the finished trifle at least 2 hours so the flavors meld and the layers set.
- Do not assemble more than 24 hours ahead or the cake may soften too much.
- Add delicate garnishes like mint leaves and sprinkles right before serving so they stay fresh and crisp.
How to Make How to Make No-Bake Red White Blue Trifle
Step 1: Prep the cake and berries
Cut your cake into 1-inch cubes and set them aside in a large bowl. Rinse the strawberries, raspberries, and blueberries, then pat them very dry with paper towels. Slice the strawberries into thin or medium slices so they layer nicely.
If you use the optional fruit soak, whisk lemon juice, honey, and vanilla in a small bowl. Toss the berries gently with the mixture and set them aside while you prepare the cream.
Step 2: Mix the cream cheese base
Place the softened cream cheese in a large mixing bowl. Beat it with a hand mixer until smooth and fluffy, about 1 to 2 minutes. Add powdered sugar, vanilla, and almond extract if you use it, then beat again until smooth and creamy.
Scrape down the sides of the bowl with a spatula so no lumps hide along the edges. Taste the mixture and adjust the sweetness with a little more powdered sugar if needed.
Step 3: Whip the cream
Pour the cold heavy cream into a separate chilled bowl. Beat on medium-high speed until it forms medium to stiff peaks, about 3 to 5 minutes, depending on your mixer. Stop and check often so you do not overwhip and turn it grainy.
If you use whipped topping instead of heavy cream, skip this step and move to folding.
Step 4: Fold the cream layers together
Add one third of the whipped cream to the cream cheese mixture. Gently fold with a spatula until it loosens and looks smooth. Add the rest of the whipped cream in two more additions, folding slowly so you keep the mixture light and airy.
If you use whipped topping, fold one tub into the sweetened cream cheese and keep the second tub plain for the top layer. Keep the finished cream mixture chilled while you prep the bowl.
Step 5: Layer the cake
If you use simple syrup, lightly brush or drizzle some over the cake cubes. Do not soak them; you want them moist but still structured. Place a single, even layer of cake cubes in the bottom of your trifle bowl.
Fill the bottom completely, but do not pack the cake too tightly. Leave some small gaps so the cream can settle between the pieces.
Step 6: Add the cream layer
Spoon a generous layer of the cream mixture over the cake. Use a spatula to spread it to the edges so you see a clean white ring through the glass. Aim for about one third of your cream mixture for each layer if you plan three full layers.
Smooth the top gently so the berries sit evenly on top. Keep the remaining cream in the fridge while you continue.
Step 7: Add the red and blue berries
Scatter a layer of strawberries and raspberries over the cream, focusing on the outer edge so the red color shows clearly. Add a layer of blueberries on top or in a separate band, depending on the pattern you want. You can create a ring of red berries around the edge and fill the center with blueberries.
Keep the layer fairly even so the next cake layer sits flat. Use about one third to half of your berries for each fruit layer, depending on how many layers you plan.
Step 8: Repeat the layers
Repeat the sequence: cake cubes, cream, then berries. Press the cake cubes down very gently so they settle into the cream but do not crush the berries. Continue until you reach near the top of the bowl.
Finish with a thick layer of cream on top. Save enough berries for a decorative pattern on the final surface.
Step 9: Decorate the top
Arrange strawberries and blueberries on the top cream layer in a flag-inspired pattern or simple rings. You can line sliced strawberries in stripes and cluster blueberries in one corner, or just scatter them casually for a rustic look. Add mint leaves and sprinkles if you like.
Keep the top neat so the dessert looks festive on the table. Cover the bowl with plastic wrap and chill at least 2 hours before serving.
Step 10: Chill and serve
Chill the trifle for 2 to 4 hours so the flavors blend and the cake softens slightly. You can chill it up to 24 hours, but aim for the shorter range if you like more texture in the cake. When you serve, use a large serving spoon and dig straight down so every scoop includes cake, cream, and berries.
Wipe the rim of the bowl before you bring it to the table so it looks clean and party-ready. Expect people to ask for seconds, so you may want to claim your portion early.
Variations I've Tried
-
Lemon cheesecake trifle
Add 1 tablespoon lemon zest and 2 tablespoons lemon juice to the cream cheese mixture. Use lemon pound cake and keep the same berries. The flavor turns bright and tangy, almost like a berry lemon cheesecake in a bowl. -
Gluten-free trifle
Use your favorite gluten-free pound cake or vanilla sponge. Check that your extracts and sprinkles list gluten-free on the label. The rest of the recipe stays the same and still tastes rich and creamy. -
Lighter yogurt trifle
Swap half of the cream cheese with thick Greek yogurt and reduce the powdered sugar slightly. Fold in whipped cream as usual. The texture stays creamy but tastes a bit tangier and lighter. -
Kid-friendly pudding trifle
Prepare instant vanilla pudding with cold milk and fold in whipped topping. Skip the cream cheese entirely. Layer the pudding mixture with cake and berries for a softer, more pudding-style dessert that kids love.
How to Serve How to Make No-Bake Red White Blue Trifle
Serve this trifle straight from the fridge so the cream holds its shape and tastes cool and refreshing. Scoop generous portions into clear cups or bowls so everyone sees the red, white, and blue layers. Pair it with iced tea, lemonade, or sparkling water with fresh berries for a full patriotic spread.
This dessert works well for cookouts, potlucks, birthday parties, or any summer gathering that needs a showy dessert without oven time. If you serve a crowd, set a second spoon nearby so people can serve themselves quickly.
How to store
- Cover the trifle tightly with plastic wrap and keep it in the fridge for up to 2 days for best texture.
- Store any leftovers in individual airtight containers in the fridge if the big bowl looks messy after serving.
- Avoid freezing the assembled trifle, since the cream and berries lose their texture after thawing.
- If you need to prep ahead, store the cake cubes, whipped cream mixture, and berries separately in the fridge for up to 1 day, then assemble a few hours before serving.

No-Bake Red White Blue Trifle
Ingredients
Instructions
- Cut the cake into 1-inch cubes and set aside in a large bowl. Rinse strawberries, raspberries, and blueberries, then pat them very dry with paper towels. Slice the strawberries into medium slices so they layer neatly.
- If using the optional fruit soak, whisk together lemon juice, honey or maple syrup, and vanilla in a small bowl. Toss the berries gently with this mixture and set aside.
- Place softened cream cheese in a large mixing bowl. Beat with a hand mixer until smooth and fluffy, about 1–2 minutes. Add powdered sugar, vanilla, and almond extract if using, then beat again until smooth and creamy. Taste and adjust sweetness if needed.
- In a separate chilled bowl, pour in the cold heavy cream. Beat on medium-high speed until medium to stiff peaks form, 3–5 minutes, checking often so it does not turn grainy.
- Fold one-third of the whipped cream into the cream cheese mixture with a spatula until smooth. Gently fold in the remaining whipped cream in two additions, keeping the mixture light and airy. Keep chilled while you prep the bowl.
- If using simple syrup, heat water and sugar in a small pot until the sugar dissolves, then cool and stir in the extract. Lightly brush or drizzle the cooled syrup over the cake cubes—moisten but do not soak them.
- Place an even layer of cake cubes in the bottom of a large glass trifle bowl, filling the bottom but not packing them tightly so the cream can settle between pieces.
- Spoon a generous layer of the cream mixture over the cake, using about one-third of the cream. Spread it to the edges so you see a clean white ring through the glass and smooth the top lightly.
- Scatter a layer of strawberries and raspberries over the cream, concentrating some along the outer edge for a strong red ring. Add a layer or band of blueberries on top or in the center, keeping the fruit layer fairly even.
- Repeat the layers—cake cubes, cream, then berries—using gentle pressure to settle the cake into the cream without crushing the fruit. Continue until you near the top of the bowl, finishing with a thick layer of cream on top.
- Decorate the top cream layer with strawberries and blueberries in a flag-inspired pattern, in rings, or scattered casually. Add mint leaves and sprinkles if desired. Cover with plastic wrap and chill at least 2 hours so the layers set.
- When ready to serve, keep the trifle chilled until the last moment. Use a large serving spoon to scoop straight down so each portion includes cake, cream, and berries. Wipe the rim of the bowl before bringing it to the table.
Notes
Approximate for 1 of 12 servings using pound cake, full-fat cream cheese, heavy cream, and berries: 380–420 calories; fat 24–28 g; saturated fat 14–17 g; carbohydrates 38–45 g; fiber 3–4 g; sugars 27–32 g; protein 5–7 g; sodium 220–280 mg. Values will vary based on cake type, added sweeteners, and toppings.